Not every web application can handle Kerberos SSO, but some provide OpenID and/or SAML. There is how Keycloak comes into the game. You can use Keycloak to federate users from different sources. This guide shows how to integrate Keyclock and FreeIPA to authenticate users in WordPress. On clients that are enrolled in IPA, this even works without a password, a Kerberos ticket is good enough to log in.
What is Keycloak
Keycloak is the upstream project for Red Hat SSO. It is a JBoss application that can federate users from various LDAP servers such as 389-Server, OpenLDAP and also MS Active Directory. It provides Single Sign On (SSO) for web application capabilities with OpenID and SAML2.
A very nice feature is the capability of using Kerberos tickets from clients that make password-based authentication obsolete.
Requirements
I’ll describe how to set up the commercially supported products provided by Red Hat, namely RHEL8 and Red Hat SSO. It is expected to work as well with the upstream projects, but please be aware that upstream products never provide formal commercial support.
- A base installation of RHEL8
- A subscription for RHEL8 and JBoss EAP
- A configured and working FreeIPA/Red Hat IdM environment (optional)
- An instance of WordPress or any other OpenID enabled Web application (optional)
The system requirements for a very basic setup are rather small. 2 Gbyte of RAM and 50 Gbyte of disk is more than enough.
Be aware that Red Hat SSO comes with a basic Database called H2. That is not suited for a larger production environment. For production environments, user PostgreSQL instead. For better scalability and availability you also should consider creating a cluster of SSO instances using the same shared database. External Database and Clustering is out of scope in this document, it may be covered in a later article.
This setup is also using a Letsencrypt x509 certificate and makes use of an Apache HTTP based reverse Proxy for better handling of certificates and access control.
Installation
Ensure you have the following yum repositories available:
- JBoss Enterprise Application Platform 7.2 RHEL 8 RPMs x86_64
- Red Hat CodeReady Linux Builder for RHEL 8 x86_64 RPMs x86_64 8
- Single Sign-On 7.3 for RHEL 8 x86_64 RPMs x86_64
subscription-manager repos --enable=jb-eap-7.2-for-rhel-8-x86_64-rpms --enable=rhel-8-for-x86_64-baseos-rpms --enable=rhel-8-for-x86_64-appstream-rpms --enable=codeready-builder-for-rhel-8-x86_64-rpms
The next step is to install the yum packages needed
yum install rh-sso* httpd mod_ssl socat
Install the acme shell script for Letsencrypt certificate handling:
curl https://get.acme.sh | sh
Enable firewall
It is recommended to make use of an host based firewall, its simple:
# HTTP is used for letsencrypt only
firewall-cmd --add-service=http --permanent

# Needed for the reverse proxy
firewall-cmd --add-service=https --permanent
firewall-cmd --reload
Reverse Proxy configuration
Apply the following patch to make Red Hat SSO aware of the proxy usage:
--- /etc/opt/rh/rh-sso7/keycloak/standalone/standalone.xml.orig 2019-04-02 03:31:07.480115492 +0000
+++ /etc/opt/rh/rh-sso7/keycloak/standalone/standalone.xml      2019-04-02 03:32:45.946964803 +0000
@@ -464,7 +464,8 @@
         <subsystem xmlns="urn:jboss:domain:undertow:7.0" default-server="default-server" default-virtual-host="default-host" default-servlet-container="default" default-security-domain="other">
             <buffer-cache name="default"/>
             <server name="default-server">
-                <http-listener name="default" socket-binding="http" redirect-socket="https" enable-http2="true"/>
+                <!-- <http-listener name="default" socket-binding="http" redirect-socket="https" enable-http2="true"/> -->
+               <http-listener name="default" socket-binding="http" proxy-address-forwarding="true" redirect-socket="proxy-https" />
                 <https-listener name="https" socket-binding="https" security-realm="ApplicationRealm" enable-http2="true"/>
                 <host name="default-host" alias="localhost">
                     <location name="/" handler="welcome-content"/>
@@ -575,6 +576,8 @@
         <socket-binding name="https" port="${jboss.https.port:8443}"/>
         <socket-binding name="txn-recovery-environment" port="4712"/>
         <socket-binding name="txn-status-manager" port="4713"/>
+       <!-- added for reverse proxy -->
+       <socket-binding name="proxy-https" port="443"/>
         <outbound-socket-binding name="mail-smtp">
             <remote-destination host="localhost" port="25"/>
         </outbound-socket-binding>
Enable and start the Apache HTTPd
systemctl enable httpd
systemctl start httpd
Obtain a certificate
acme.sh --issue -d sso.example.com -w /var/www/html
Install the certificate
/root/.acme.sh/acme.sh --install-cert -d sso.example.com \
--cert-file      /etc/pki/tls/certs/sso.example.cert  \
--key-file       /etc/pki/tls/private/sso.example.com.key  \
--fullchain-file /etc/pki/tls/certs/fullchain.pem
Configure Apache
Edit /etc/httpd/conf.d/ssl.conf and change the certifcate configuration to point to the Letsencrypt certificates:
SSLCertificateFile /etc/pki/tls/certs/fullchain.pem
SSLCertificateKeyFile /etc/pki/tls/private/sso.example.com.key
Reverse Proxy config
ProxyPreserveHost On
SSLProxyEngine On
SSLProxyCheckPeerCN on
SSLProxyCheckPeerExpire on
RequestHeader set X-Forwarded-Proto "https"
RequestHeader set X-Forwarded-Port "443"
ProxyPass / http://127.0.0.1:8080/
ProxyPassReverse / http://127.0.0.1:8080/
Ensure Apache is allowed to do network connections:
setsebool httpd_can_network_connect on -P
Restart Apache HTTPd
systemctl restart httpd
Final steps for Red Hat SSO
Enable and start Red Hat SSO
systemctl enable rh-sso7.service
systemctl start rh-sso7.service
To be able to login in into SSO, you need to create a local user.
/opt/rh/rh-sso7/root/usr/share/keycloak/bin/add-user-keycloak.sh -u admin
You are now able to log in to Red Hat SSO with your favorite browser.
Integration with Red Hat IdM
Ensure your SSO server is enrolled in the IPA domain. There is some preparation work to do such as creating a Kerbros Service Principal for the HTTP server and fetch the Kerberos Keytab.
Create the Kerbros Service Pricipal
ipa service-add HTTP/sso.example.com
Fetch the Keytab
ipa-getkeytab -p HTTP/sso.example.com -s ipa1.example.com -k /etc/krb5-keycloak.keytab
Set correct permissions for the Keytab
chown root /etc/krb5-keycloak.keytab
chgrp jboss /etc/krb5-keycloak.keytab
chmod 640 /etc/krb5-keycloak.keytab
User federation
User federation with IPA is the second important step. It is slightly different to the nomal LDAP federation.
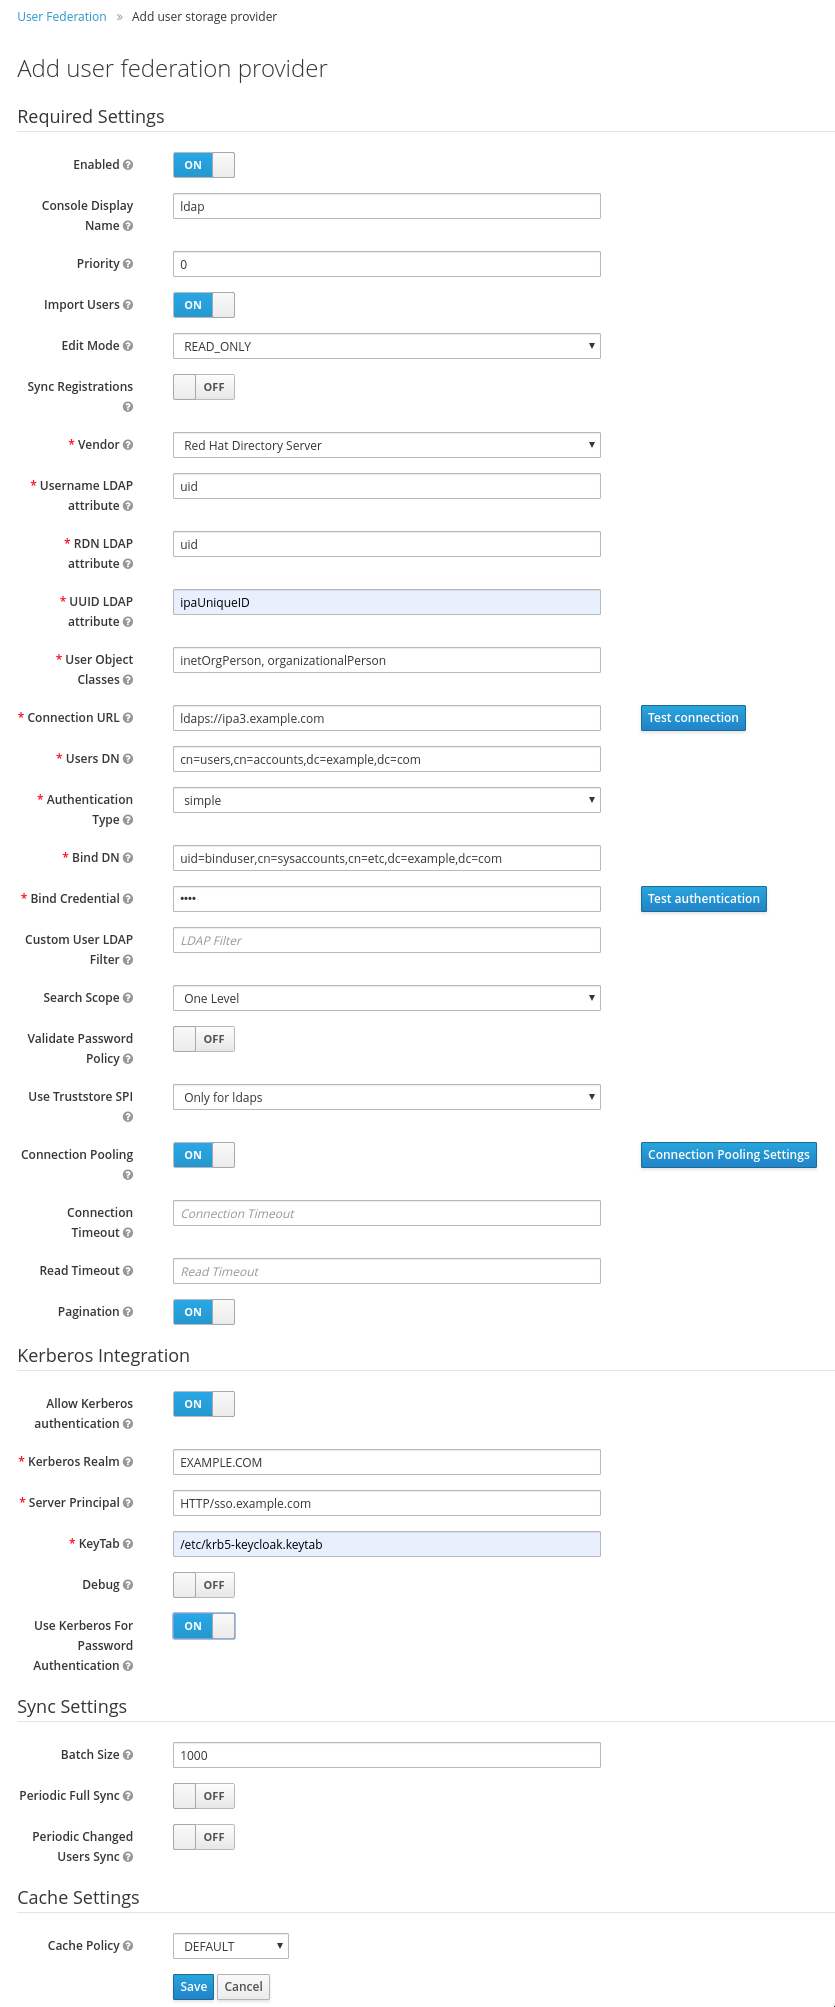
Point your bowser to https://sso.example.com/auth/admin/master/console/#/realms/master/user-federation and click on “Add provider” and select LDAP. Fill out the form as follow:
“Edit Mode” READ_ONLY
“Vendor” Red Hat Directory Server
“Username LDAP Attribute” uid
“RDN LDAP attribute” uid
“UUID LDAP attribute” ipaUniqueID
“User Object Class” inetOrgPerson, organizationalPerson
“Connection URL” ldaps://ipa1.example.com
“Users DN” cn=users,cn=accounts,dc=example,dc=com
“Authentication Type” simple
“Bind DN” uid=binduser,cn=sysaccounts,cn=etc,dc=example,dc=com
“Bind Credential” your super secret password
“Allow Kerberos authentication” to On
“Kerberos Realm” EXAMPLE.COMA
“Server Principal” HTTP/sso.example.com
“Keytab” /etc/krb5-keycloak.keytab
“Use Kerberos For Password Authentication” On
Or have a look at the screenshot
The next step is more or less cosmetic, the mapping of attributes. Go to the newly created federation provider and click in the “Mappers” tab, click on “First Name” and change “LDAP Attribute” to “givenName”.
That’s it.
Registering a client
Point your browser to https://sso.example.com/auth/admin/master/console/#/create/client/master
Choose a client ID, i.e. “WordPress” and provide the Root URL, i.e. https://www.example.com.
Creating a initial access token
Point your browser to https://sso.example.com/auth/admin/master/console/#/realms/master/client-registration/client-initial-access/create and click on save.
You will get the token displayed. Be aware that this token shows only once, copy and paste it to a secure place.
Enable WordPress for OpenID and connect it to Red Hat SSO
Point your brower to https://www.example.com/wp-admin/plugin-install.php?s=OpenID+Connect+Generic&tab=search&type=term to search for the Plugin “OpenID Connect Generic” and click on “Install Now”.
OpenID Setup
Point your browser to https://www.example.com/wp-admin/options-general.php?page=openid-connect-generic-settings.
Fill in the form as shown in the below screenshot. The “Client ID” and “Client Secret Key” corresponds to the previously defined ID and “initial Access Token” defined in Red Hat SSO before.
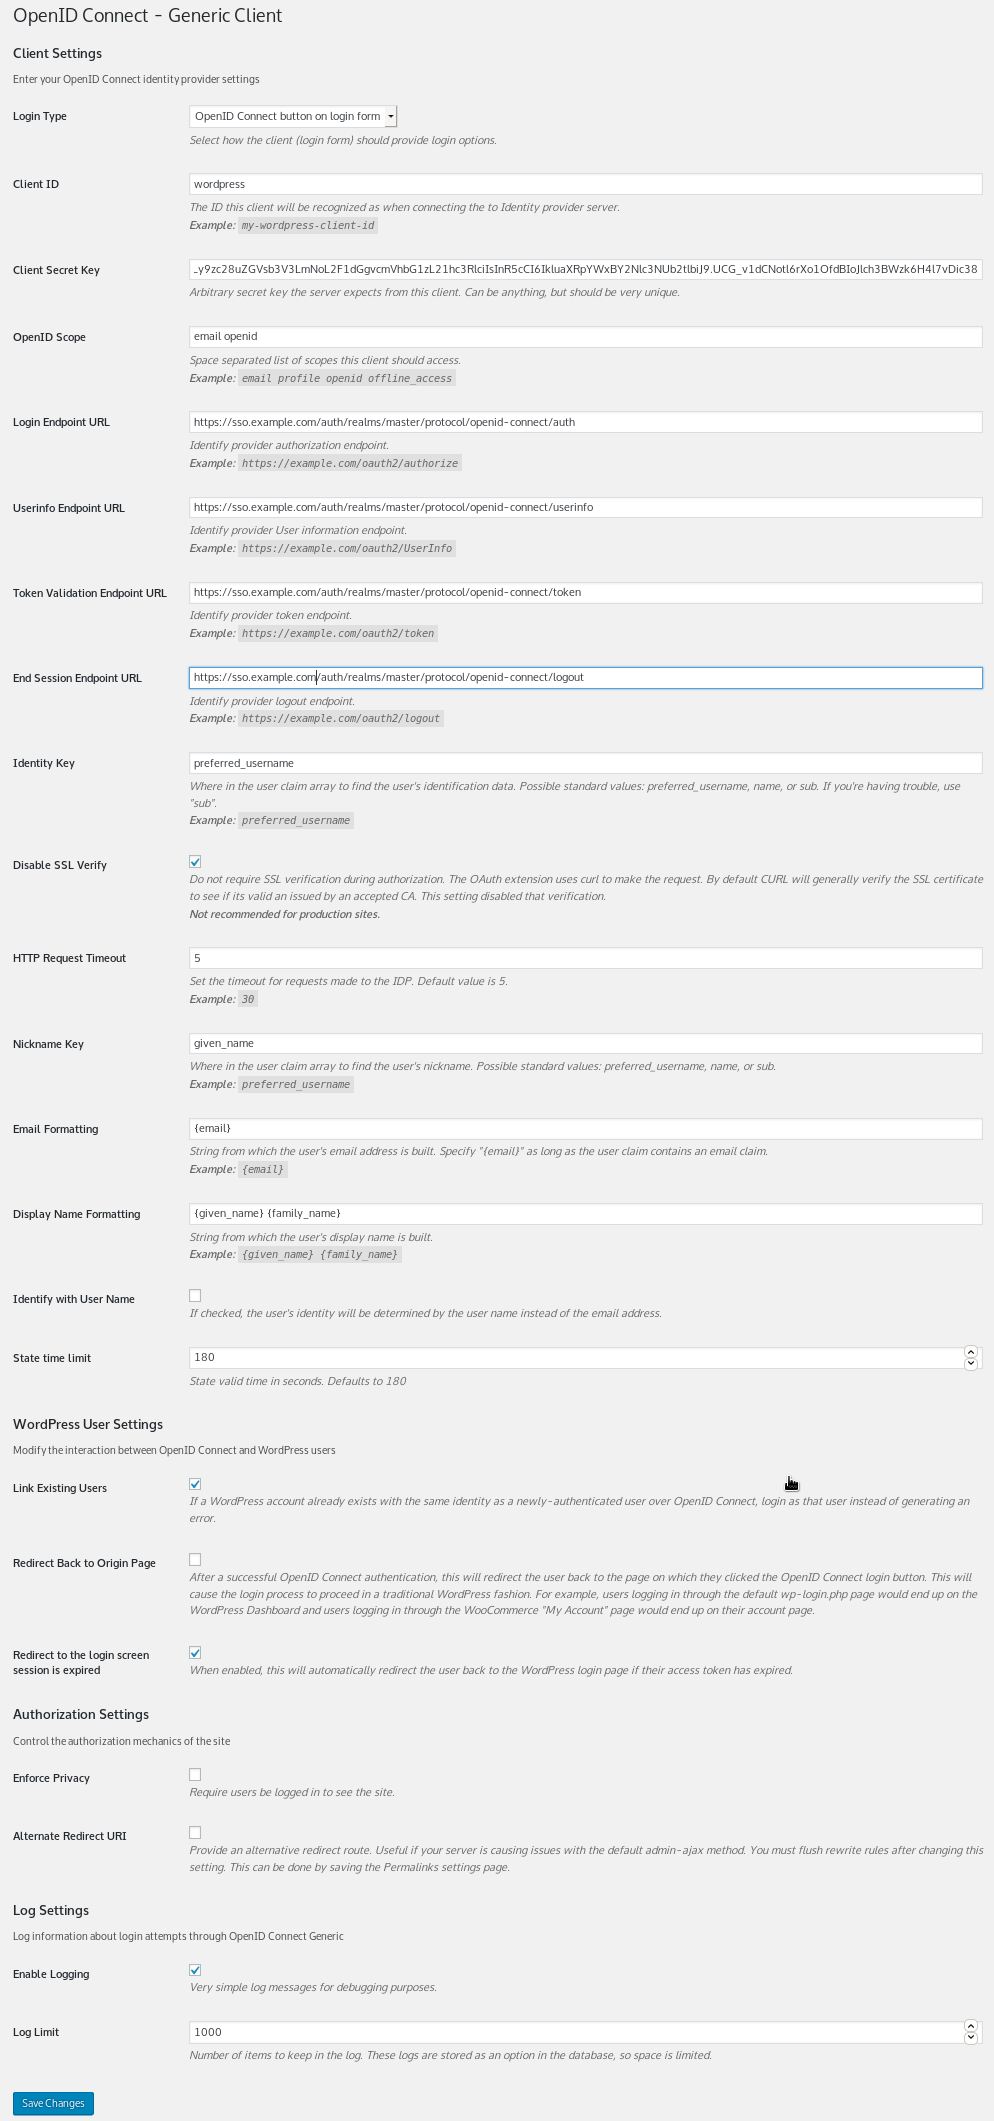
Click on “save”, log out, log in again and client on the “Login with OpenID Connect”. You will get redirected to the Red Hat SSO login form, or in case you have a Kerberos Ticket, you are automatically logged in to WordPress.
Be aware that every user in Red Hat IdM will be able to login to WordPress in the role “Subscriber”. You need to promote them to another role manually.
This Guide is only about authentication, not about authorization. This will be covered in a separate article somewhere in the future.
Feedback is always welcome. Have fun 🙂
what is the advantage of using IPA as user provider instead of regular LDAP?
does keytab provide kerberos by itself or it just use it as client?
Hi,
1. The advantage of using IPA over regular LDAP is that you easily can create host based access control rules, automembership rules, Kerberos enrollment of clients etc.
If you are using Keycloak only for web applications and the like there is no advantage. The advantage kicks in when using IPA as system level authentication provider (think of ssh) and integrate it with Keycloak for web applications.
2. If I understood the question correctly, you are taking about the Kerberos Principal of the SSO host? That needs to done manually.
Of course the client also needs a Kerberos Principal plus the users Kerberos Ticket must be there. If the users Ticket is missing, one will be prompted for the password.
Clients Kerberos Principals are created when enrolling the system to the IPA environmen
Thanks,
Luc